
How to Create an Online School From Scratch: Step-by-Step Guide 2026

An online school is a business that teaches paid courses online: lessons, student access, payments and support run on one platform. To create one from scratch, choose a niche and check demand, build a first course, pick a platform, set up a sales funnel and launch with a small first group. Then improve it based on what students do.
Key takeaways
- Start with an audience problem and test demand before recording lessons.
- Pick the format first: recorded course, cohort, mentoring or a mix.
- Your platform should handle lessons, payments, access and progress without code.
- Calculate the funnel with your own numbers, not borrowed benchmarks.
- Launch to a small first group and fix the course on their feedback.
Step 1. Choose a Niche and Validate Demand
A niche is the specific intersection of a topic, your expertise, and the audience problem you solve.
The biggest mistake beginners make is starting with course creation. The correct sequence: first find an audience with a problem, then offer a solution in the form of education.
How to find a profitable niche
A profitable niche sits at the intersection of three factors: your expertise, market demand, and the audience’s willingness to pay. Verify each one:
Expertise. List 5-10 topics where you have hands-on experience and proven results. Not certificates or diplomas — real case studies: ‘helped 30 clients lose 5+ kg,’ ‘built a sales team from 0 to 15 reps.’
Demand. Check search suggestions and keyword research tools for your topic. Look for queries such as “course [topic],” “learn [skill]” and “how to [result].” Search interest helps you research a topic but does not prove willingness to pay. Test that through audience conversations and a specific offer.
Willingness to pay. Find paid products in your niche and review their curricula, feedback and sales terms. Check demand through conversations with potential students or a small offer test. The existence of a similar course does not prove people will buy yours.
Validate your niche in 7 days
Don’t spend months on research. Here’s a rapid validation plan:
Days 1-2: Create a landing page or social media post describing your course. Include the problem, the promised result, and the price.
Days 3-5: Run $30-50 in ads or post 5-7 times in relevant communities. Collect pre-orders or webinar registrations.
Days 6-7: Review lead sources, audience questions and pre-orders. Compare results with costs and the offer terms. If response is limited, check reach and clarity before drawing a conclusion about the niche.
Examples of niches to research
Examples of areas in which to investigate demand:
IT & digital skills: programming, data analytics, UX/UI design, no-code development and prompt engineering. These are areas to investigate; check demand for a specific learning task.
Business & entrepreneurship: e-commerce launch, marketplace selling, SMM for business and financial literacy. Choose a specific audience problem and test willingness to pay for help with it.
Health & wellness: nutrition, fitness programs, mental health and yoga. Check audience needs and whether one-time payment or a subscription suits the specific program.
Creative skills: photography, video editing, illustration and calligraphy. Price and potential audience depend on the topic, learning level and support included.
Languages & test prep: English for IT, business language courses and international exam preparation. Check current requests and seasonal patterns for the specific audience.
Find out how students plan to use the learning outcome at work, in a project or in daily life. Test the value and willingness to pay for a specific offer rather than inferring profitability from the niche alone.
Step 2. Define the Format and Course Structure
Format determines how you teach, how much of your time each student needs and how easily the school can grow. Let’s review the main options.
Online learning formats
|
Format |
When to use |
| Pre-recorded video courses | When students need to study at their own pace. Recordings can be reused; plan how you will update the material and support students. |
| Cohort-based learning | When students need a shared schedule, deadlines and feedback. Set group size and price according to teaching capacity and the support included. |
| Mentoring / coaching | When students need individual feedback and help with personal learning goals. Choose one-to-one or group sessions according to the mentor’s available time. |
| Microlearning | When material can be divided into short lessons with a focused practical task. This format can support workplace learning and access from mobile devices. |
| Blended (hybrid) | When independent study with recordings benefits from live question-and-answer sessions. Define the meeting schedule and level of support in advance. |
Course structure: the “Hero’s Journey” formula
An effective course takes the student from problem to result through clear stages. Use this framework:
Module 1 — Awareness. The student understands where they are now and sees a clear picture of the desired outcome. Duration: 2-3 lessons.
Modules 2-5 — Transformation. Step-by-step skill building. Each module ends with a practical assignment. One module = one specific outcome.
Final module — Integration. The student applies everything learned in a real project and receives feedback.
Set module and lesson counts according to learning goals and practice needs. Start with a compact structure, test it with students and add what is missing for the stated outcome.
Step 3. Create the Learning Content
Check whether learning materials are clear, usable and aligned with course goals. Collect feedback and progress data to identify changes students need.
Minimum equipment setup
Start with a trial recording using the equipment you have. Check audio, lighting and screen readability, then decide what you need to buy.
Camera: a recent smartphone is enough for talking-head videos. Record a test clip and check sharpness and framing.
Microphone: a lavalier or USB microphone. Test it in your room and check whether speech is clear.
Lighting: a lamp or natural window light. Check that your face is evenly lit and there are no unwanted shadows.
Screen recording: any screen recording app works for screencasts. Check the current features and terms of the tool you choose.
Equipment budget: calculate it using the trial recording and current prices.
Lesson formats that work
Talking head with slides: one possible lesson format. Combine the instructor’s explanation with slides according to the learning task. Any presentation editor will do for the slides.
Screencast with voiceover: a good fit for technical courses. Show your screen and narrate each step.
Animated explanations: for complex concepts. Start with simple animation in a presentation editor and move to a dedicated tool only if students need it.
Set lesson length according to the learning task. Break complex topics into logical parts. Test with students whether the explanation is clear and they have enough time to practise.
Supplementary materials for engagement
Add workbooks (PDF/Google Docs), checklists, quizzes, templates and examples that help students complete a learning task. Choose question counts according to assessment goals and check how students use the materials.
Step 4. Choose a Platform for Your Online School
Your platform (LMS — Learning Management System) is the foundation of your school. It determines how students experience the course, how you accept payments, and how you scale your business.
What to look for when choosing an LMS
Student limits. Check whether a plan limits active students or charges extra fees. Calculate costs for current and possible future enrollment using the platform’s actual terms.
Pricing model. Fixed price or pay-as-you-go? A transparent model with no billing surprises is essential for financial planning.
Payment systems. Check that the payment system works in your country of registration, accepts the payment methods your students use and supports the currencies you need. Compare its fees and payout terms. The payment systems Softbook connects are listed on the integrations page.
Engagement tools. Points, badges, rankings, communities and messaging can support learning tasks. Check which tools your audience needs and how students use them.
Automation. Email sequences, reminders, automatic certificates and chatbots can reduce manual tasks. Compare time spent before and after setup, including monitoring and maintenance.
For the full list of criteria, see how to choose an LMS platform. If you are still deciding between social media, a marketplace, your own website and a platform, start with where to host an online course.
Softbook — a platform with unlimited students
Softbook is a platform for online schools: courses, sales, CRM, email and Telegram campaigns, and a website builder in one place. You can add unlimited students, and the platform takes no commission on your sales. For a new school, this means the course, the sales page, payments and student communication live in one account. See how the online course platform works and what it includes for online schools.
Leads, deals and orders go to the built-in CRM for sales, where a deal can be created after an order or after payment. Students get access to the course automatically once they pay. If you get stuck, Softbook Care answers around the clock.
Because the price does not depend on the number of students, that part of the budget stays predictable as the school grows. Plan separately for payment system fees, content production, your team and advertising.
Step 5. Build Your Sales Funnel
Selling requires both a useful course and a path from first contact to purchase. Plan your offer, audience acquisition and checkout as carefully as you plan the lessons. A funnel helps you see where people stop. For channels, pricing and repeat sales, see the guide on how to sell online courses.
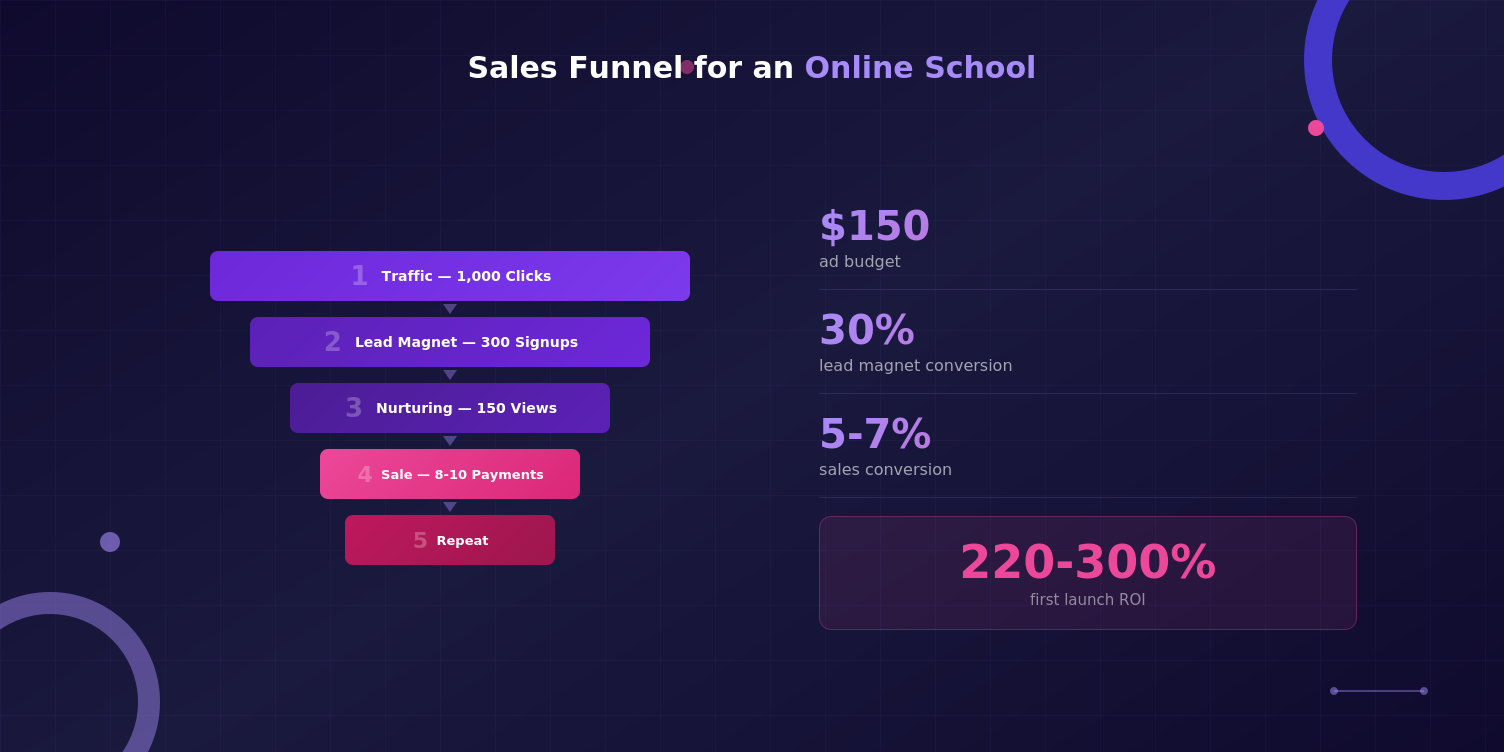
Basic funnel for an online school
Stage 1 — Traffic. Social media (Instagram, TikTok, YouTube), SEO blog, paid ads. Goal: drive people to a free offer.
Stage 2 — Lead. A visitor shares a contact in exchange for a webinar, mini-course, guide or checklist. Lead conversion is the number of visitors who submit a contact divided by page visitors over the same period. Compare like-for-like traffic sources and assess lead quality separately.
Stage 3 — Nurturing. A series of 3-5 emails where you deliver value, share case studies, and gently lead toward the sale. Duration: 5-10 days.
Stage 4 — Purchase. Offer the course on a page, in a webinar or through an email series. Purchase conversion is buyers divided by people in a defined group over the same period. Measure visitors, subscribers and webinar attendees separately because they enter at different points.
Stage 5 — Repeat purchase. Offer alumni relevant further learning: the next course, a consultation or a content library. Measure repeat purchases and their costs separately from acquiring new students.
How to calculate your funnel
Calculate the funnel with your own numbers, not borrowed benchmarks. For the same period, write down four counts: ad clicks or page visitors, registrations, people who attended the webinar or opened the emails, and buyers. Divide each count by the one before it to see the conversion at each stage.
Then compare revenue with all costs, not only advertising: refunds, payment system fees, the platform, production and team work. Start improving at the stage with the biggest drop. If you sell in several currencies, fix an exchange rate before you compare launches.
How it works in Softbook. Build the offer page and set up contact capture, emails and the automations you need. Connect an available payment integration and link the product to the course. Before launch, follow a test buyer’s path from enquiry to payment and learning access.
Step 6. Price Your Course
Course pricing is the choice of model and amount for which a student gets access to your training.
Pricing is one of the trickiest tasks for new online schools. Here’s a practical approach.
Three pricing models
One-time payment — the student pays for the course in one payment. State the access period, included materials and support terms clearly. Set the price with reference to costs and testing of the offer.
Subscription — a recurring payment for access to a course library. Track monthly recurring revenue (MRR), renewals and cancellations. Explain access terms and price before payment.
Tiered pricing — multiple packages with different access levels. Example: Basic (lessons only) — $50, Standard (+ graded assignments) — $100, Premium (+ mentoring) — $200.
How to set your price: a formula
Test the course price together with the offer: what learning includes, who needs it and what it costs you to deliver. Discuss budgets with potential students and test demand. A percentage of an assumed future benefit does not establish a fair price or guarantee a student’s return.
How it works in Softbook. Each of these models can be set up through the product’s payment page — one-time, subscription, or a tiered model with several packages. Promo codes, time-limited discounts, and promo codes stacked on top of discounts let you test price elasticity without hurting your brand.
Test the price alongside the offer and your teaching and support costs. A low price alone does not determine course quality, student motivation or completion.
Step 7. Launch and Gather Feedback
Your first launch isn’t the finish line — it’s the beginning of an iterative process.
Soft launch strategy
Don’t try to sell to thousands right away. Your first cohort is your focus group:
Size: set the first cohort size according to your team’s ability to provide support and collect useful feedback.
Price: agree on the first cohort’s terms and how you will collect feedback. If you offer a discount, base it on costs and explain the conditions clearly.
Format: cohort-based — everyone goes through the course simultaneously. This builds community and keeps you in the loop.
What to track after launch
Course completion. Define completion criteria and allow enough learning time. Measure students who meet the criteria as a share of those who have had enough time. If the rate changes, investigate acquisition sources, format, difficulty and support; the percentage alone does not identify the cause.
NPS. Ask how likely a student is to recommend the course on a 0–10 scale. Subtract the percentage of 0–6 answers from the percentage of 9–10 answers, each calculated across all respondents. NPS ranges from −100 to 100. Ask for the reason behind the rating and compare cohorts consistently. NPS method.
Drop-off points. At which lesson do students stop? This signals content that needs reworking or simplifying.
Free-to-paid conversion. If you offer a free trial, track how many people upgrade to the full version.
Step 8. Scale Your School
Scaling an online school means growing revenue without a proportional growth in your time per student.
After a successful first launch, it’s time to scale.
Horizontal scaling
Offer further courses when they match your audience’s needs. After an introductory course, test interest in advanced material or a related skill. Evaluate repeat purchases and customer lifetime value (LTV) using actual data.
Vertical scaling
Check whether your audience needs additional support, such as mentoring, corporate training or certification. Define the new package, calculate delivery costs and test the offer before changing the price.
Automation — the key to scale
At this stage, automation becomes critical. Set up automated email sequences for new students, reminders about incomplete lessons, automatic certificate issuance, and chatbots to handle common questions.
Modern LMS platforms like Softbook include built-in automation tools: email campaigns, chatbots, and CRM. For a detailed breakdown of which processes to automate first, see our guide “Online School Automation”. Everything runs in one system, on one subscription.
Common Mistakes When Creating an Online School
1. Perfectionism at launch. A ‘perfect’ course you spend 6 months recording is worse than a ‘good enough’ one launched in 6 weeks. Early students buy your expertise, not Hollywood production quality.
2. No email list. Social platforms can change algorithms overnight. Your email list is your asset. Start collecting emails from day one, even if the course isn’t ready yet.
3. Topic too broad. State who the course is for and which task it helps them complete. For example, “Email Marketing for E-commerce Stores” identifies an audience and a topic. Test demand and the clarity of the offer rather than assuming that a narrower topic will produce sales.
4. Ignoring community. Create a chat, forum or use the platform’s built-in social network when it supports learning tasks. Plan moderation and track participation and learning outcomes without assuming a guaranteed increase in completion.
5. Wrong platform choice. A platform capped at 1,000 students seems cheap at the start but becomes a trap as you grow. Choose a solution that scales with your school.
6. No analytics from day one. If you aren’t tracking conversions, traffic sources, and student behavior, you’re making decisions blindly. Set up Google Analytics, Facebook Pixel, and UTM tags before your first launch.
7. Copying competitors instead of creating unique value. Study what others do, but find your own angle. Your uniqueness lies in your experience, methodology, and personality. The market doesn’t need another copy — it needs a fresh approach to solving the problem.
Checklist: Launch Readiness for Your Online School
Before your first launch, make sure you have everything in place:
☐ Niche selected; evidence of interest and willingness to pay reviewed.
☐ Course structure finalized: every module has a learning goal and a way to assess the result.
☐ Materials promised for launch are ready; the schedule for remaining materials is agreed with students and the team.
☐ Supplementary materials prepared (workbooks, checklists, quizzes)
☐ LMS platform configured (course uploaded, payments connected, automations running)
☐ Sales page or landing page ready (course description, curriculum, price, testimonials or case studies)
☐ Email funnel set up (lead magnet, nurture sequence, sales email)
☐ Test budget defined according to the objective, acquisition channel and affordable costs.
☐ Community created (a Telegram group or the platform’s built-in social network)
☐ Legal setup completed (business registered, terms of service published)
Before launch, check all critical commitments: materials, access, payments, support and purchase terms. A count of checked boxes does not establish readiness. Resolve issues that would prevent you from delivering what students were promised.
Conclusion: Your 30-Day Action Plan
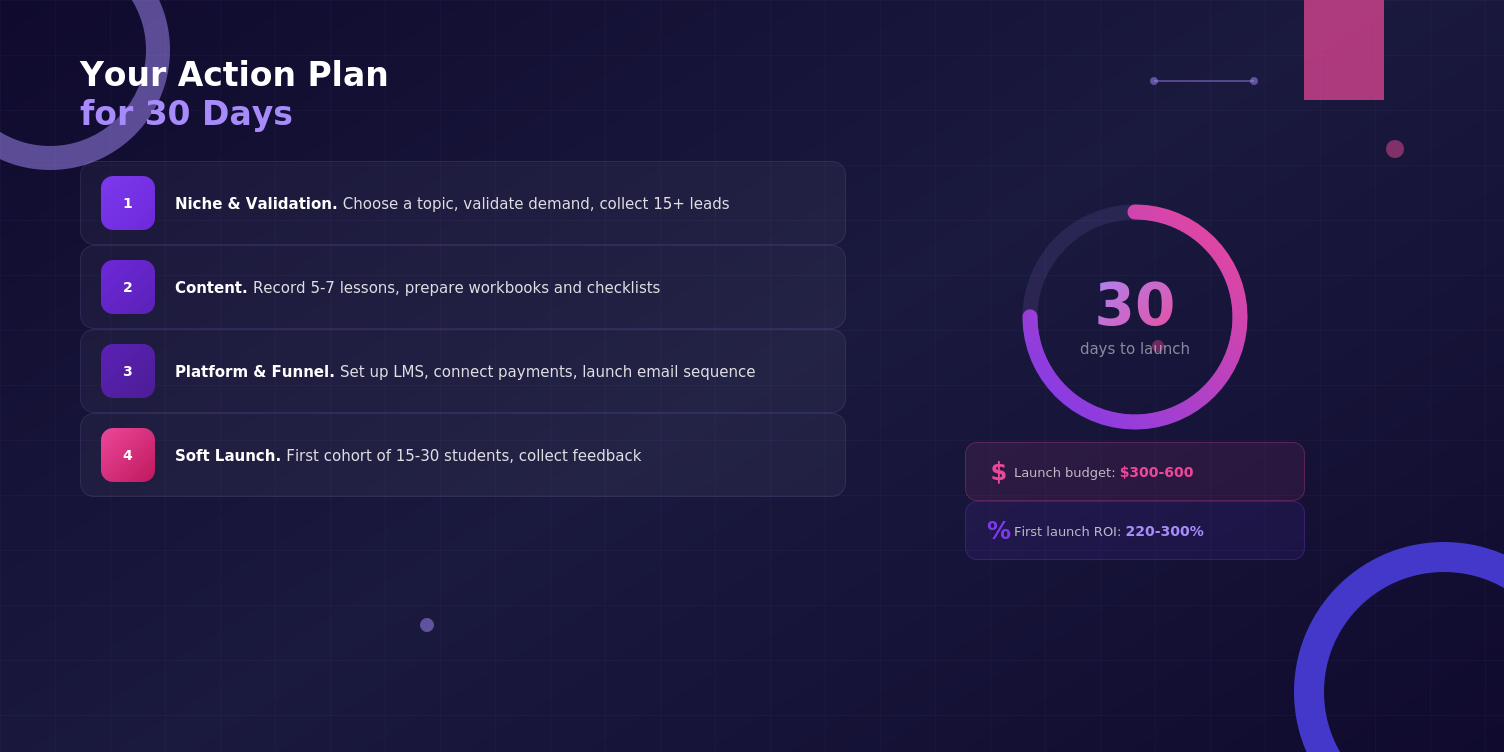
Creating an online school is not a one-time event — it’s a process. Here’s your concrete plan:
Week 1: Choose a niche and run validation. Define the format and course structure.
Weeks 2-3: Record the first 5-7 lessons. Prepare supplementary materials.
Weeks 3-4: Set up the platform, upload content, build the sales funnel.
Weeks 4-5: Run a soft launch with the first cohort. Gather feedback.
An online school needs a learning program, audience development and an operating plan. Compare expected revenue with costs and team capacity, and test your assumptions at each stage.
Choose a launch date according to demand for your offer and your ability to deliver what students expect. Assess competitors in the specific niche and use test results to guide the next decisions.
Frequently asked questions
How much does it cost to start an online school?
The cost depends on what you already have and which work you do yourself. Count equipment, content production, the platform subscription, payment system fees, your team and an advertising test as separate lines. First lessons can be recorded on a smartphone with a simple microphone, and you can upgrade later if students need better quality. Softbook's current prices are on its pricing page.
How long does it take to create an online school?
Most of the time goes into the content, not the technical setup. Choosing a niche, testing demand and recording lessons depend on how much material you already have and how much time your team can give. The platform part is quick: in Softbook, you can have a school with a course and payments switched on 15 minutes after sign-up.
Can I start an online school without an audience?
Yes, but check demand before you record the whole course. Talk to potential students, publish a short description of the course with the price, and see whether people sign up for a webinar or pre-order. A small first group lets you test the offer and the lessons at a low cost. Collect email addresses from day one so you can reach these people again.
What platform do I need to start an online school?
You need a platform that hosts lessons, opens access after payment and shows each student's progress. Compare student limits, fees on sales, the payment systems it works with, built-in email and CRM tools, and whether you can build pages without code. Softbook keeps these in one account, with unlimited students and no commission on your sales.
Can I launch an online school without my own expertise?
Yes, as a producer. You find an expert and handle recording, marketing and sales. Agree in writing on who does what, who owns the course materials, who covers which costs and how revenue is split. There is no standard split for every project, so base it on the work and the risk each side takes on.